Visar inlägg med etikett Tips & Tricks. Visa alla inlägg

tisdag 20 mars 2018

:: Tips and Tricks with Ulrika aka LillBlomman #9 ::

Time for a new Tips and Tricks from me. Lately I have tried a new technique how to arrange your stamped images in a circle. It´s really fun and easy and the effect really is cute!


First you need to decide your theme. I wanted to use one of my new sets from Lawn Fawn called Fairy Friends. A super cute set!


I tried out a circle size that fits my background well. Then I use a soft pencil. I use the kind of pencils that you use for sketching. You will erase the lines when you are ready with your stamping and it´s not so nice if you can see the lines after erasing them.
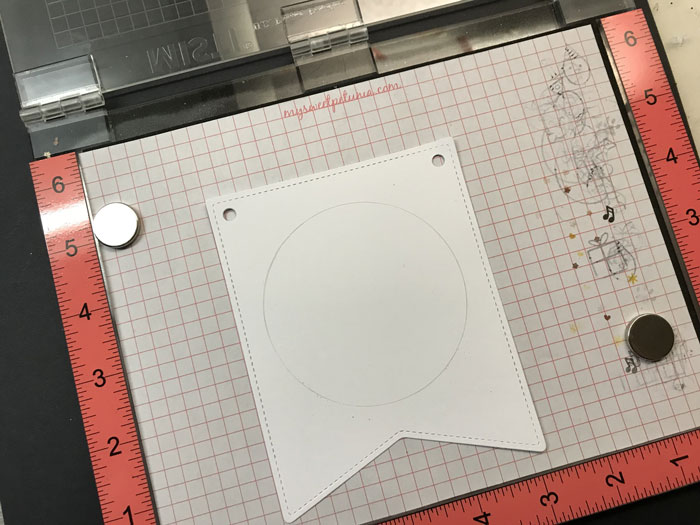

Now the fun part starts! Depending on what kind of theme and how large your stamps are you can arrange them differently. I started with my fairies and used one of the three images two times. Then I added smaller images as flowers and butterflies.


For the smallest images I used two different colors of Archival Ink pads. If you want to you can also fill the gaps with dots made with your Copics. Or maybe dots made with Glitter Stickles. The last step will be to erase the pencil lines.


Time for some coloring with my Copics!


 I hope this tips was useful for you :) On Thursday I will show you another cute card created with this super fun technique!

Supplies List:
Lawn Fawn Stitched Party Banners
Lawn Fawn Stitched Scalloped Border
Lawn Fawn Stitched Border
Lawn Fawn Happy Birthday Border
Lawn Fawn Fairy Friends Set
Lawn Fawn Yay Kites Set
Lawn Fawn Stinkin Cute
Lawn Fawn Critters At The Dog Park
Lawn Fawn Polka Mon Amie 6x6
Archival Ink Chrome Yellow, Viridian
Memento Tuxedo Black
Copic Markers G40, YG05, YG11
Copic Markers R11, Y21, Y23, YR12, YR31
Copic Markers W0, W1, W3
Copic Markers E00, E01, E11

onsdag 28 februari 2018

:: Tips and Tricks with Ulrika aka LillBlomman #8 ::

It´s so fun to find new ways to use your supplies! I wanted some kind of jungle feeling background for my previous Shaker card. I thought it could be cute with lians in different green shades. Suddenly I came up with the idea of using my Stiched Hillside dies and use the space after taking off the die-cuts as a stencil.

I used different angles of the dies. Make sure to leave some space on your cardstock so that the stencil don´t break.

Use your favorite white paper that works well with Distress Ink and a Blending Tool.

First I used light green shades random over my paper. You want your lians to show and then your background can´t bee too dark.

Use Washitape to make sure that both paper and Stencil don´t move when you add your colors. I started with Forest Moss.

This is how it looks after the first color. But to get a cool jungle feeling you need to add more layers and colors.

I also used Peeled Paint and Moved Lawn. After every layer you move your Stencil to the right and  to the left or even upside down to get the lians loop to different directions.

The next step is to create the frame and box for the leaves. I always use EK Success powder to stop the static on the OH sheets. For this card I will use 3d tape instead of the foam sheet I used on my Shaker Card with three windows.

Now the background is ready for the sloth gang. You find my list of supplies at my prevoius post where you also can see my finished card.


lördag 24 februari 2018

:: Tips and Tricks with Ulrika aka LillBlomman #7 ::

I really love to crate Shaker cards! They are fun and easy to create. There are different techniques how to create them and here is one of them. You find my list of supplies in my previous post.

For this card I use a piece from a 3 mm thick foam sheet. I like to use foam sheets because you get at sturdy and even background. 

You can use any shape for your windows. I use a stiched square from Lawn Fawn. Measure where you want your frames and windows. I drew lines on the inside of the frames. Then I die-cut a slightly bigger hole than the inside of the frame. You don´t want the foam too close to the frame edges.

After that you cut out the holes in the patterned paper you do the same with the foam. Draw inside of the windows.

This is how it should look.

This kind of thick foam don´t work in my Sizzix. I use a scalpel instead.

Now it´s time to add my plasic sheet. I use a OH sheet. I think a double-sided tape is the best choice when you mount the OH. You want to make sure that none of the glitter can escape.

On the other side you mount your frames. For those I use Tacky Glue. I want to be able to correct the frames in the exact right position. If you find that the edges aren´t perfectly tight to your patterned paper you can use the plastic thingie from the double-sided tape and add a tiny amount of glue and push it under the edges.

Time to choose images for the windows. I picked some darn cute monkeys from Lawn Fawn.

I also wanted some speech bubbles with sentiments on my card.

Now I add the foam on the back. For this step I also use Tacky Glue. I always use EK Success powder on both windows and papers. That provent static. It not so fun if all of your glitter or sequins are stuck on the OH. Add glitter and sequins in the windows and mount your front to your card base.  I decided to add patterned paper and only one of the monkeys inside of my windows. I fussy cutted the other two and mounted with 3d tape.


måndag 29 januari 2018

:: Tips and Tricks with Ulrika aka LillBlomman #6 ::

It was over two month ago since I showed you a Tips and Tricks and today I´m back with a new one!
It´s not hard at all to build a scene with your dies from Lawn Fawn! I really love playing with mine and let my imagination be a bit free! Today I will show you how I made this scene with the lazy bunny. I wanted my stitches to be all around the edges and this is how I did it.

This is my finished card. My bunny is a stamp from a Swedish brand called Skyming Design. They aren´t aviable on the market anymore so I´m happy I own this one! So darn cute!

 He´s colored with my Copics.


Here is my supplies list:
Lawn Fawn Happy Summer Stamps
Lawn Fawn Year Two Stamps
Lawn Fawn A Birdie Told Me Set
Lawn Fawn Stitched Mountain Dies
Lawn Fawn Forest Border Die
Lawn Fawn Grassy Border Die
Lawn Fawn Outside Scalloped Rectangle Stackables Dies
Lawn Fawn Stitched Rectangle Frame Small
Lawn Fawn Stitched Rectangle Frame Large
Skymning Design Vårkänslor (bunny)
Copic E70, E71, E74
Copic R20, R21


Copic G14
Memento Tuxedo Black
Misti
Sizzix Big Shot

1.
 Prepare your background with the black scalloped frame. Cut out the mountains with the highest peaks the way my photo shows. I don´t want stitches on the highest peak.

 Measure the new row with mountains on front of the first one so it looks good on your card.

 Carefully remove the one you already cut after putting the frame in place.

 Mount the mountains on your base. You can see how nice the stitches look at the edges.

 Now on to the grass borders. I used two different colors on my cardstock. Make sure to move the borders a bit so that the grass isn´t at the exact same places.

 When I mount my different pieces I use different thickness on my 3d tape and squares.

 I also wanted a Forest Border in front of the mountains.
I fussy cutted my bunny and let him lie a little both in front and behind the grass.
Last I added a speech bubble with a sentiment on. A really fund and easy card to make!


fredag 10 november 2017

:: Tips and Tricks with Ulrika aka LillBlomman #5

Tips and Tricks #5 - Sugar Flowers

I love to give my flowers some extra sparkle! Today I will show you my favorite technique when it comes to glitter on flowers. Of course you can use Stickles Glue and other kind of glitter but these two I will show you today is a bit extra cool! Perfect for your winter wonderland cards!

You need flowers and of course I use the best brand when it comes to smaller Roses - those from Wild Orchid Craft! Now you wonder why I like them so much? Besides being really pretty and well performed they are sturdy so that you can add Multimedium without the Roses loses it´s shape. Then you need some kind of Multimedium. Today I use some from 13arts. And then you need Distress Stickles Dry Glitter - Clear Rock Candy and Primas Glass Glitter Pearl.

Dip the Rose in the Multimedium. If you only want the glitter on the tip of the petals be light on the hand. 

I want my glitter all the way in the middle of the petals so I use a brush to spread the Multimedium with.

Now you dip the Rose in the loose glitter. Make sure that you cover the whole Rose.

It´s really hard to take good photos of glitter, sorry for that, but you get a really sparkling Rose that almost feels like glass when it dries.

Now we do the same with some other Roses that I want a different look for. Here I´m after almost a icy look. You know as if the Rose has been outside and the frost or rime got to it.

Here are the result with the Distress Dry Glitter. Looove it! 

And here are the ones with the rime effect on! Gorgeous! Soon you will see these Roses on some of my Christmas Cards!

måndag 23 oktober 2017

:: Tips and Tricks with Ulrika aka LillBlomman #4 ::

Tips and Trick #4 - Faux Bow

Bows are really nice to add on cards and other projects! But sometimes it´s really hard to get them even and nice. The knot in the middle gets really bulky and not nice at all! We need nice bows so today help is on it´s way crafters! 
Lets´make some faux bows!

 You need some pretty ribbon and mine bow will end up on a christmas card so I use a checkered ribbon. Measure how big you want your bow and cut off the rtibbon after doing as I show you on the photo. I cut my egdes in a inclined angle. 

 When you´re satisfied with the size use a piece of sewing thread around the middle of the bow. Make sure it´s centered. In this state you can choose what side of the bow will be forward or backward. 

 Now you need a short piece of the ribbon to make the knot. 

 Fold the ribbon so the back look like it does on my photo.

 Place the short piece of the ribbon with the flat side down and the side of the bow that will be the front against the back of the short piece of ribbon.

 Use some kind of adhesive to hold the back in place. I think a glue gun is perfect or glue dots. 

Tadaaaa! A perfect and pretty bow!