Visar inlägg med etikett alter. Visa alla inlägg

torsdag 23 november 2017

:: Christmas Hearts for Wild Orchid Crafts ::

I found some hearts in some kind of plaster at ÖB for 50% off. Now I have given the hearts a real makeover! First I painted them with Gesso then I added Texture Paste throw a stencil to get a bit texture on the surface. Then I added one coat of Distress Paint Peeled Paint and one mixed coat of Prima Sparks Fairy Wings and Dragon´s eye. I also added some Wax for even more shine.

When it was all dry the fun started with lots of flowers, glitter, glassfiller and Artstones.

I used following products from Wild Orchid Crafts:


Here you find the other supplies I used:
Distress Paint Peeled Paint
Prima Acrylic Paint Sparks Dragon´s Eye
Prima Acrylic Paint Sparks Fairy Wings
Prima Antique Brilliance Wax Lucky Emerald
Prima Metallique Wax Vintage Gold
Prima Mini Artstones
Prima Artstones
Memory Box Stars Shimmers Stencil
Deco Art Modeling Paste
13arts Ayeeda Ink Green Glitter

tisdag 21 november 2017

:: Altered Glass Bottle ::


 I found a fun challenge over at Scraphuset and this is my project made for the all black challenge.
It´s a bif difficult to take photos of this kind of project so I hope you can see all textures and different shapes. I started with a flee market find - a glass bottle for some kind of liquor.

I painted the whole bottle with white gesso and on some areas I used crackle paste and a brick stencil.

I made several different shapes with paperclay. When it all was dry I glued them to the bottle. I also added both regular size and mini artstones from Prima.

 When it was dry I added a layer of black acrylic paint.

Last I added Prima Wax with my fingertips. 


My list of supplies:
Daler Rowney Gesso
Studio Acrylic Paint Charcoal Black
Prima Metallique Wax Old Silver
Prima Artstones
Prima Mini Artstones
Martha Stewart Paperclay
Molds - angels, crowns, butterflies, keyhole, different ornaments
Tim Holtz mini stencil set 3
Prima 3d Matte Gel
DecoArt Crackle Paste


måndag 11 september 2017

:: Altered Bread Brush ::

I made this altered bread brush back in July and finally I have made a blog post with it! This kind of work is a bit out of my ordinary comfort zone so I hope you like it!
It was very fun to make but it took me many days from start to a finished brush. There are so many layers and I needed lot of drying time. As you can see on this first photo I have used lot of yummie supplies from Prima. Not all on the photo but some of them.

The chipboards that I used are from Blue Fern Studios and the large resin ornament from Prima. I made the leaves and the butterflies with paperclay and molds. 

Besides all the sprays and paints I used Art-stones from Prima for even more textures. I also used loose glitters and micro beads. 

To get a dramatic look with lot of depth I added darker colors in the cavities and high lighted the peaks with gesso and light shades of waxes. 


onsdag 31 maj 2017

:: Exploding Box for Pyssloteket ::

I´m not the girl who folds complicated cards but when it comes to a fun Exploding Box I´m game!
I made this Exploding Box and matching tag as DT work for Pyssloteket.

I got the idea of making a Exploding Box when I saw all the wise messages on the papers from Prima. The paper is from the Rose Quartz - Grateful Heart. I used my Sizzix Big Shot and die-cutted one circle in dark grey Cardstock and one smaller with the words on. Behind the circles I used a paper called Always and Forever from the Love Clippings collection. That paper has really nice and shiny copper details.

For the middle square I used words that I cut in pieces and added the same grey Cardstock as behind the circles behind each word. I just love to play with papers in this kind of way. 

I got some scrap over so I also decided to make a matching Tag for the Box.
For the outside of the Exploding Box and for the Tag I used Rose Quartz - Midningt Beauty paper. For the Tag I used lots of fun stuff from Prima as Art Stones, Copper Micro Beads and flowers! The flowers I used are called Love Clippings - Little bits of my hearts, Wild and Free - Moonlit Passion and Adventurers, Ransley. The sticker is from a Tim Holtz word package. Just love them! On the flower stems that I screwed around a brush shaft I used Primas Metallique Wax in the color called Rich Copper. I also added the Wax here and there on the Box and Tag.

tisdag 20 december 2016

:: Christmas card and a box published at The Papercrafting ::

I was asked in October to join The Papercrafting "Julkalender" and of course I said yes! It was such a fun theme! I was to create a Christmas card and also something handmade who fittd as a Christmas gift. I made this box. On the lid I made a shaker scene with snow. I used paper and image from Maja Design.

This is the card I made. I used Prima Sweet Peppermint collection.

All flowers are also from Prima. I added more glitter on them.

The circle frame is a die from Spellbinders. The snowflake is a punsch from Martha Stewart. In the middle of the snowflakes I used Prima Druzy Stones. I also used a sentiment die from Rox Stamps that says God Jul. God Jul is Merry Christmas in Swedish.


fredag 13 mars 2015

:: A altered phone book ::

 I bought a really inexpensive phone book and gave it a whole new look. 
I used papers from Blue Fern Studios called Sanctuary Botanical Garden and Sanctuary Correspondence. I ripped the papers in small pieces and used Decoupage to get a durable surface. 

 I also used Chipboards from Blue Fern Studios called Tattered Butterflies and Arrow Words. The bordesr are from Tim Holtz and the Rhinestones from Bo Bunny and Papirdesign.


måndag 16 februari 2015

:: Tutorial Box Folding ::

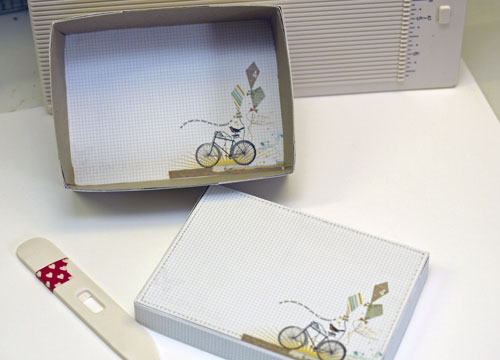
There are many good tools if you want to make boxes. For example them from We R Memory Keepers called Punch Boards. But sometimes when I want a box in a very specific measure I like to use Marta Stewart Crafts Scoring Boards. For the box I´m showing today I used the Martha Stewart Mini Scoring Board. Decide hos large the base of your box should be and how high your walls need to be. Cut a paper where you have added all your measurements. Score around your base or bottom.

Cut as my image shows in your scored folds. Use a Bone Folder when you fold up all the edges.

I like to use doublesided tape when I make boxes. It attaches immideately and don´t wrinkle the paper.

Make the lid the same way taht you did the box. You need to add about 4 millimeter and make the edges a bit lower. I usually make my edges 1,5 centimeters.

My Scoring Board is in inches so if I need to measure in exact centimeters I only use a ruler. I put the ruler at the vertical end of my paper. Then I fit the paper so I score at the right spot.


Now my box is finnished and the lid fits perfectly! It´s also room for paper that I want to embellish my box with.

Measue all edges on the box and cut out the patterned paper. Attatch with doublesided tape. If you want nice and neat corners dress the long sides of the box first as my photo shows. Then you cut the paper for the short sides and attach them a little bit overlapping.

Now we have a box with a nice outside but I always embellish the inside of the box also. You get a steady box and you can also hide small flaws from the folding. And of course it looks very nice!

I measure and score to get nice corners for the inside of the box. I also use the same technique with the overlapping pieces as I did with the outside of the box.

Alrighty! Now we have a handmade box.Very easy and very personal.


List of supplies
Martha Stewart Crafts Mini Scoring Board 42-05013
Martha Stewart Crafts Paper Trimmer M281055
Scrapbook Adhesives EZ Runner Perm 01644-6
Bazzil Classic White T10-1005
Bazzil Classic Kraft T9-960
My Minds Eye Record It Follow Your Heart 6x6 paper Pad REC111
Martha Stewart Crafts Pink Bone Folder 42-05001

torsdag 5 februari 2015

:: Box with mini cards ::

Who wouldn´t love to get a box filled with love cards?! I for sure would love it!

I folded my box myself and will have a tutorial how I make them next week.

Here are all cards from the box . I made eight cards and they are a bit smaller than my usual size on cards. They are 10,8x7,5 centimeters.

On the black one I used a embossing folder from Crate paper and a vellum sentiments. On the right card I did some fussy cutting and cut out the house from one of the papers,

Gold is so in! And I love gold together with black! All my emebllishmnets comes from Crate Paper Open Book collection. On the right one I used striped tape.

Over to two cards in a little bit softer and more romantic color scheme. Lots of layers with stickers, die-cuts and rub-ons.

The two last cards are a bit more cool and whimsical. I like the black that really brings out the other colors.


List of supplies
Martha Stewart Paper Trimmer M281055
Bazzil Classic Black T10-1075
Bazzil Classic White T10-1005
Bazzil Classic Kraft T9-960
My Minds Eye Record It Follow Your Heart 6x6 paper Pad REC111
Crate Papers Open Book Little Notes 683554
Crate Papers Open Book Full Heart 683569
Crate Papers Open Book Rub-on transfers 683579
Crate Papers Open Book Embellishment Jar 683590
Crate Papers Open Book Vellum Shapes 683578
Crate Papers Open Book Ribbon Tags 683588
Crate Papers Open Book Embossing folder 683591
Crate Papers Open Book Accent Stickers 683576
Crate Papers Open Book Label Maker Stickers 683581
Crate Papers Open Book Ephemera Pack 683577


fredag 16 januari 2015

:: Cute Birdhouse for Hobbyworld ::

For a while ago I bought a pine birdhouse. Cute but quite dull! I decided to give it a make-over and painted it with achrylic paint from Martha Stewart. I also wanted to add some fun details and make it more personal. I love birds and added cute hearts from Crate Paper. I painted them in a little bit darker color and the rest of the house. Now the birds in my gaden eat like royals!


List of supplies
Crate Paper Open Book Embellishment Jar 683590
Martha Stewart Craft Paint Basic Brush Set PL32244
Martha Stewart Craft Paint Gesso Primer White PL32314
Martha Stewart Crafts Satin Pool PL32014
Martha Stewart Crafts Satin Pond PL32015

söndag 11 januari 2015

:: So happy over my new assignment at Hobbyworld ::

I´m so happy over my new assignment at Hobbyworld! The girls in the team are so sweet and they are actually all friends of mine so I feel very at home. I got one amazing first box filled with goodises to play with and I have so much fun creating with the supplies!

Today I have a little tutorial on how easy you can give an old cylinder box a make over. I wanted it to have a winter feeling but you can use any color och patterned paper to change the look of the box.

This is how the box looked when I started.

 Start with die-cut different pieces of Sizzix Bigz Tattered Florals.

 Moist them vey lightely with water.

 Cut the middle six petal flowers a bit to get deeper leaves.

 Use a stylus tool to cup the flowers.

 Glue the largest flowers together a bit off centered.

 Continue To add the next sixe of flowers. Use a lot of layers if you want a very filled flower.

On the last flower you bend the petals and glue them together so you get a closed bud.


Materiallista/ List of supplies
WMRK Crafters Tools Stylus Tool 70951-0
Sizzix Bigz Die Tattered Floral by Tim Holtz 656640
Bazzil Classic White T10-1005
MD Creatable Candles LR0243
MD Creatable Holly LR0244
MD Creatable Snowflake LR0185
MSC Floral Medallion Deep Edge Punch 42-70057 
MSC Swirling Lace Punch around the page set 42-60051

Ni hittar allt material hos våra Återförsäljare/Retailers.